Last week I went to Tokiwa for having light iftar. At Tokiwa, I always pass by to fabric section and other crafts for craftwork accessories. I think, it was more than 10 times I went there then buying nothing! But, happened suddenly I pass by craft books rack…then my eyes looking at a one book. It is ribbon embroidery book. The book is nice, simple instruction and I think, it is good book for beginner like me. The author is Japanese. The think that I love about this book is the simple photo instruction steps, basic techniques and also colorful ribbon used. Eventhough not much sample for pattern design, this book is good for beginner, for those who are the first time want to learn about ribbon embroidery technique, and want to learn basic simple techniques, this book is good for you. This book is not suitable for mid-end beginner, intermediate or advanced since they show very simple basic techniques. The price is cheaper than other ribbon embroidery books. This book maybe one of the best cheapest books to motivate for your first move to enjoy your first embroidery.
Since this book is in Japanese, You don’t have to worry. You will understand the steps by looking at the photo instruction steps given. Very clear photo instruction and easy to follow.
What is the book title? How much the price? Who is the author? How the book looks like?
Will show you later... hehe..

Tuesday, 16 September 2008
Wednesday, 20 August 2008
Algerian Eye Stitch
It has been a long time that i do not update my blog. Since im going back to japan, i do not have much time to update my blog or finish my bazaarperantau.com website. Anyway, i try to spend my time to update this blog. For now onwards, i will collect any info thru the web and gather all in one into my blog as for reference. I dont have oportunity to learn the techniques when i in Malaysia. But I think thru the videos, slowly i will learn.
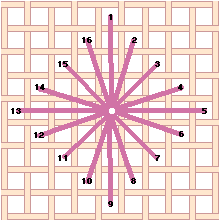
Today, I gather all about the Algerian Eye Stitch. Some people called, as Star Stitch or Star Eyelet Stitch. Below are the diagrams of Algerian Eys stitch and also similar stitch applied.
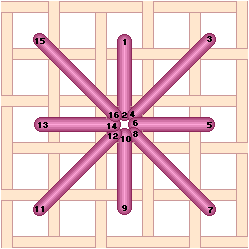
Algerian Eye Stitch
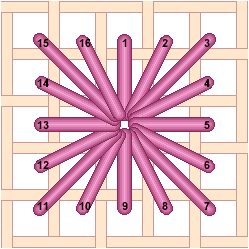
Eyelet Stitch

Round Eyelet Stitch
Diamond Eyelet Stitch
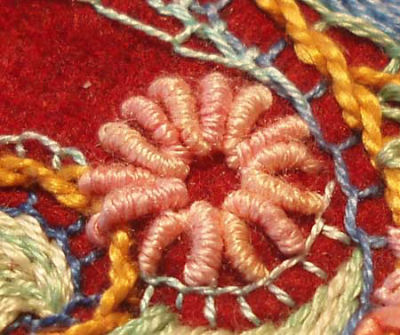
Below is the real photo on step by step Algerian Eye Stich by Sharon B

Sample design..


Nice, simple but beautiful and creative..
(source and credits : sharon b, fidella needlework )
Wednesday, 14 May 2008
Wonderful and easy Bullion Knots Technique To Follow...
One of the most challenging for embroidery hand is to do a bullion knots. Maybe some of you will say it is easy and simple to do.Just wrap the thread, then you get the result. Are they produce very well and beautiful finised result? So, you have your answer..*wink*
I saw several videos on bullion knots lately since this technique is suitable if we want to put at our tudung (hijab) as accessories. For your information, to buy a tudung with beautiful embroidered in KL is very expensive. It will cost you RM100-200..Do you capable to buy?? For me, I dont think so..
Today, I think i would like to share my favourite video of the bullion knots technique. I love all Mary Corbet's video tutorial actually. It is easy to follow and the techniques make the finished result so wonderful. So here, it is a bullion knots from Mary Corbet tutorial video. Hopefully, it will give you more inspiration and it will help you to have wonderful and beautiful roses ,daisies and other bullion finished result!
Enjoy....
Tips before you starting to do the bullion knots.
1. The needle you use is important. Yor work will be easy with a milliner (or straw) needle. The difference between milliner needles and other needles is that the entire shaft of the needle is the same diameter, so the eye doesn't bulge. This makes it easier to pull the needle through the wraps in the thread.
2. When you wrap your threads around the needle, you want them to follow the natural twist of the thread. So, for most stranded cottons and everyday threads, you're going to wrap your thread clockwise around the needle. The way to tell if you're going in the right direction is this: if, as you wrap your thread around the needle, the strands of thread start to untwist and separate, you're going in the wrong direction.
3. If you're having trouble getting the needle through th wraps, you can roll your thumb over the wraps lightly, back and forth, which will loosen them. Another trick is to roll your needle between your finger and thumb, back and forth in small movements, before you pull your thread through.
Wonderful bullion knots by Mary Corbet
 ]
]
( Resources : Mary Corbet tips, video and techniques )
Wednesday, 7 May 2008
What kind of needle to be used for Ribbon Embroidery?
Needle is most important tool to embroidery work and crafts. In order to make the easy embroidery needlework, the type of needle is also important. Referring to Di Van Kierk, there are only 5 types of needles you need for Ribbon embroidery needlework.
1. Chenille - a sharp pointed thick needle with a large eye. Size 18 for the 7mm ribbons and wool. In a mixed pack of needles, the lower the number the thicker the needle. The no 18 needle is the largest. Size 20 or 22 for the 4mm ribbons. Size 24 for the 2mm ribbons and for perlé cotton. You will also use one of the above for any yarns remember the needle needs to make a large enough hole in the fabric for the yarn to pass through easily.
2. Crewel (embroidery) - a sharp fine needle with a long, large eye. Sizes 3 - 7 for perlé cotton, Rayon and 3 to 6 strands of cotton silk and metallic threads. Sizes 8 - 10 for 1 or 2 strands of cotton, silk, rayon and metallic thread.
3. Straw (milliners) - a long sharp needle with small eye. (The eye is no wider than the shaft) This is the only needle to use for bullion knots. The wraps slip off the needle easily as the eye is not too wide. Also ideal for beading. Size 9 - 11 for one strand of stranded silk cotton or rayon, ideal for beading. Size 5 - 9 for two to four strands of silk, cotton, rayon or no 8-perlé thread.
4. Tapestry needles: as for the chenille needles in 1 above but with a blunt tip. You may wish to use this blunt needle for some of the surface stitches so that you don't snag the ribbon by mistake.
5. Betweens (quilting needles) size 1 to 12. These are short sharp needles that are good for French knots, and fast, even stitches such as seeding, running stitch; back stitch.
Friday, 2 May 2008
Amazing Di Van Niekerk's needlework
Di van Niekerk is one of the most popular embroiderer which author of several books of needlecrafts ( ribbon embroidery, stumpwork ) and she is living in cape town. Her design was so beautiful and her design may inspire all of us.
Her latest 3 titles, Ribbon Embroidery and Stumpwork, Dreamscapes in Ribbon Embroidery and Stumpwork and A Perfect World in Ribbon Embroidery and Stumpwork have been translated into several languages and these international bestsellers also can be found at Bazaar Perantau Book Store
For who interested to learn the embroidery techniques, you can find her online video at Di Van Niekerk's Video. For full version of the video, you have to purchase their DVD at Di Van Niekerk's DVD
Here, is one of the Di Van Niekerks video on how to do twirled ribbon rose. Look simple, but need more practice for fine result!
Enjoy watching!
Twirled Ribbon Rose Technique
Thursday, 1 May 2008
Bazaar Perantau Online Book Store
Yesterday, i created one online bookstore for bazaarperantau.com . At this moment, i just added embroidery category only. Later , I will be added other categories. If you interested or know the best book to share , kindly let me know. I can add the book into my book store database. Thank you.
For embroidery crafters, please welcome to my Bazaar perantau online bookstore. There are some titles that may interest you. :)
Tuesday, 29 April 2008
About Ribbon Embroidery
How To Do Ribbon Embroidery
by Alex Sysoef
Ribbon embroidery is a type of embroidery that combines the use of ribbon embroidery floss and perle cotton to create beautiful, delicate handwork. It is fairly easy to do and even a beginning embroiderer can use some simple stitches to create very nice patterns. So you may wonder what to look for when you search for instructions on how to do ribbon embroidery.
One of the most important things to consider when trying to learn how to do ribbon embroidery, also commonly called silk ribbon embroidery, is that your best sources will be ones that provide visual aids. You want to look for books, which include clear illustrations. Many craft websites offer still pictures or videos of sample projects being done. These visual helps can make the difference in doing a project correctly.
The first step to take when you want to find instructions on how to do ribbon embroidery is to decide on the type of design you would like to do. You might try purchasing a pattern book from a local or online bookstore. Many local libraries also have craft books that you can borrow. Another option is to look at some of the many places on the Internet that provide patterns and step-by-step visual instructions. There are many free patterns that you can try or you can go ahead and purchase something that looks good to you. You can find many forums and discussion groups composed of fellow embroiderers who are happy to share their patterns.
Another option to consider when trying to learn ribbon embroidery is to find a class that is being offered in your area. It is always easier to learn something like this by watching another person do it. Or if you have a friend or relative who does ribbon embroidery, ask them if they will demonstrate some of the stitches for you and then help you with your first project.
Once you find a pattern that you want to try, you will need to purchase the required supplies. Most patterns give a very specific list and you should follow their exact recommendations as much as possible. Here are some common supplies that you will need for any project:
1. An embroidery needle. Make sure the eye is large enough for ribbon to pass through. Many people recommend Chenille needles as being the best choice for ribbon embroidery as they have a large eye and a sharp tip. These needles come in different sizes so follow the recommendations for your specific pattern.
2. Silk embroidery ribbon in the colors you have selected for your design.
3. An embroidery hoop.
4. The fabric you have chosen to put your design on.
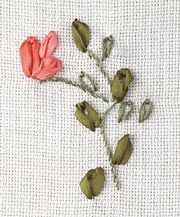
There are many different stitches that can be used alone or in combination to create various motifs or stitch patterns. The ribbon stitch is used for ribbon only. Some other basic stitches that you may need to use are lazy daisy, stem stitch, straight stitch and French knots. These stitches are also used with regular embroidery thread.
Needlework is a relaxing and enjoyable hobby for many people. By finding and learning instructions on how to do ribbon embroidery, you can create many lovely pieces to pass on to friends and family.
Friday, 25 April 2008
Embroiderer Blogs
Today, I would like to share and happily added the link of Sharon Baggon's (Sharon B) blog and Mary Corbet Website. Sharon B's blog (In A minute a go) and Mary Corbet ( Needle's N Thread) are my favorite blog and reference which is I hope it will inspire the embroiderers and as a good knowledge for a beginner. Mary Corbet is very kind to show us her private video for most of the stitches techniques. Very clear video instruction. It is good for beginner.
I also added one of my favorite embroiderer, Umi. I love her embroidery work and design. The design and her embroidery handwork very nice and beautiful. You can see her handwork at Embroidered Gift
If you have great website, resources and blog for stitches, embroidery and good free pattern/design to share, email me at mylina_crafts[at].yahoo.com. Thank you.
Tuesday, 22 April 2008
Basic Embroidery Techniques
Basically, there are many techniques applied when doing embroidery or stitches. I don't have any basic for the stitches, but i really want to learn. Yesterday, I google for the technique, and here are some of the stitches and embroidery techniques for beginner that I think it is the best for the first lesson and beginner like me.
Basic Embroidery Techniques
1. Straight Stitch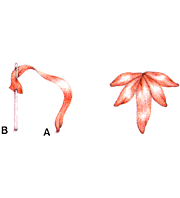
1. Bring up at A, pull through.
2. Insert down at B, pull through.
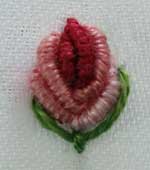
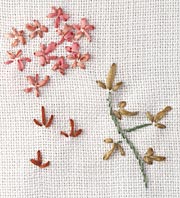
2. Japanese Ribbon Stitch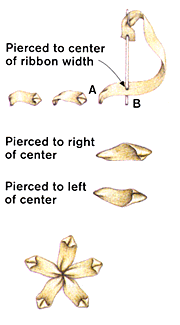

1. Bring up at A, pull through.
2. Lay ribbon flat on fabric and insert needle at B, piercing ribbon and pulling through slowly. Ribbon will curl into B, so don't pull tightly, or effect will be lost. To vary curl, pierce B to right or left of center of ribbon width.
Tip: If ribbon appears straight and narrow, make another stitch on top of first one.
3. Lady Daisy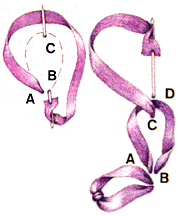
Use for petals or leaves with ribbon, floss, or perle cotton
1. Bring up at A, pull through.
2. Make loop in direction of other end of stitch and insert at B, a thread or two to side of A. Pull out at C, in direction needle points until loose loop is formed, then stitch back down at D. Note: To prevent ribbon from twisting when it's drawn through fabric after pulling out at C, arrange it around needle so it's flat. Gently hold in place with thumb while sliding needle and ribbon through.
4. French Knots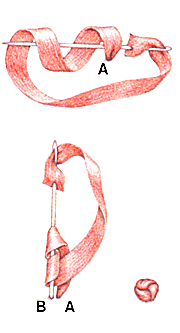
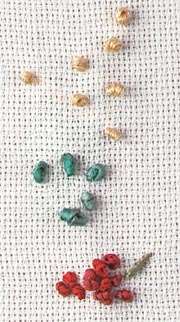
1. Bring up at A, pull through. Holding ribbon or thread, lay needle on top.
2. Wrap ribbon or thread around needle two to three times. Insert needle at B a thread or two from A. Gently slide wrapped ribbon/thread down needle to rest against fabric, and pull through.
5. Stem Stitch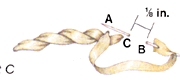
Use this stitch for flower stems and outlining.
1. Bring up at A, pull through.
2. Insert needle at B on stem line. Holding thread below line, pull out at C directly in line with last stitch (not above or below) and 1/8 in. from B, pull through. Continue to end of line, making sure thread is always held below line of stitching.
( Resources : www.tounton.com )
Other Resources and Links


